The European Union is ahead of us when it comes to protecting your data on the web. I have a feeling we'll eventually see legislation here in the US, as well, mandating that we be a little more forthcoming with how readily we invade consumer privacy. The General Data Protection Regulation (GDPR) employed in the EU, however, has meant that sites there are now required to obtain free consent from their users in regard to cookies. You've probably already seen it in action--a site running a subtle but nonetheless attention grabbing banner (usually in the header) asking whether you're down with cookies:
Yeah... we know you don't really care, but this site uses cookies. Here's a link to our [privacy policy]. Have a nice day!
The tricky thing about GDPR, though, is that in order to comply, you need to get free consent. This means that it's not enough to simply announce your use of cookies--your users need to be able to opt into them. And, let's be honest, that's the right way to do it anyways. Business owners: a quick reminder--implied consent is downright trashy depending on context:
See, when she walked in wearing short shorts, I just assumed she wanted me to grab her butt. If she didn't want it, why was she wearing short shorts?
It's 2020. Don't be a sleaze; ask for user consent.
On the development side, the problem seems a wee bit intimidating, though. How do we stop all those tracking/remarketing/advertising scripts from running at page load and how do we give users the power to trigger them? Assuming you're using Tag Manager to load the scripts in the first place, it's actually not that big a deal. Here's what we'll need:
- A block requesting consent; we'll use this to allow users to trigger an on-site cookie.
- The actual cookie; this will trigger Tag Manager to load our various scripts.
- A little setup over at Tag Manger so we can use click and cookie events to finalize the deal.
There are a few more details we'll cover within these three steps, but none of it's particularly difficult. Ready? GO!
Step 1: Creating the block
It doesn't have to be anything special--we just need to ask permission and allow users to answer "yes" or "no"; in fact, keep it to a bare minimum--something like this (forgive me my inline CSS):
<div style="width: 100%; background: #333333; color: #fff; text-align: center; padding: 1rem;" id="block-cookiedisclaimer">
  <p>This site uses cookies to analyze and track on-site user behavior. Please review our
  <a href="/privacy-policy">Privacy Policy</a> if this is a concern for you. Would you like
  to allow cookies for this site?</p>

  <div style="display: flex; flex-flow: row nowrap; justify-content: space-between; width: 250px; margin: auto;">
    <div onclick="setCookie()" style="display: block; padding: 0.5rem 1rem; border: 1px solid #fff; width: 75px; text-align: center;">
      <a href="#" id="consent" style="color: #fff; text-decoration: none;">Yes</a>
    </div>

    <div onclick="closeBlock()" style="display: block; padding: 0.5rem 1rem; border: 1px solid #fff; width: 75px; text-align: center;">
      <a href="#" style="color: #fff; text-decoration: none;">No</a>
    </div>
  </div>
</div>
The important parts are bolded: you'll want an id attribute for the consenting "YES" link; and we'll need to run two different onclick JavaScript functions depending on whether users choose to consent or not. We'll come back to the Javascript in Step 2, but be sure to take note of the id value you've assigned to your "YES" link. In my case, I've gone with something affirmative and easy to remember: "consent"--we'll need to reference this in Step 3 once we get to Tag Manager.
Step 2: Creating a cookie
This is actually two steps:
- We want to create a cookie that we can use as a trigger over at Tag Manager. That trigger will tell Tag Manager to go ahead and load our cookie bearing scripts.
- We want to create a script that will allow users to opt out: to close the block and prevent Tag Manager from triggering our scripts.
Here's what the cookie might look like; if you're feeling particularly lazy, throw it in a script tag and place it below the block you just finished:
//CLOSE THE BLOCK
function closeBlock() {
    document.getElementById("block-cookiedisclaimer").style.display = "none";
}

//IF COOKIE ALREADY SET, CLOSE BLOCK;
if (document.cookie.indexOf("consent=") >= 0) {
    closeBlock();
}

//OPT IN AND SET COOKIE
function setCookie() {
    //START BY CLOSING THE BLOCK
    document.getElementById("block-cookiedisclaimer").style.display = "none";

    //SET COOKIE TO EXPIRE EVERY 7 DAYS
    //MEANING BLOCK WILL SHOW EVERY 7 DAYS
    date = new Date();
    date.setTime(date.getTime() + 7*24*60*60*1000); //7 DAYS
    var done = date.toUTCString();
    document.cookie = "consent=yes; expires=" + done + "; path=/";
}
Here's what's going on with this:
- We'll reference the closeBlock() function as an onclick in our "No" link--effectively allowing users to opt out.
- We'll reference the setCookie() function as an onclick in our "Yes" link--this will set the cookie and we can use it to trigger loading our scripts at Tag Manager.
You'll want to note that the cookie is called "consent" and it has a value of "yes". We'll need to reference this once we get to Step 3.
Step 3: Setting variables and triggers at Tag Manager
Believe it or not, this is the most challenging step. We need to tell Tag Manager, "hey!--see that 'consent' cookie over on our site? If you see it, load our tag/script!". If you have multiple tags loading cookies on your site, you'll need to repeat these steps for each tag. If not, it will be pretty straightforward. Let's say we're working with Google's Universal Analytics tag. I'll assume you've already got the tag set up in Tag Manager, so let's jump right into setting the variables and triggers for our new opt-in to work.
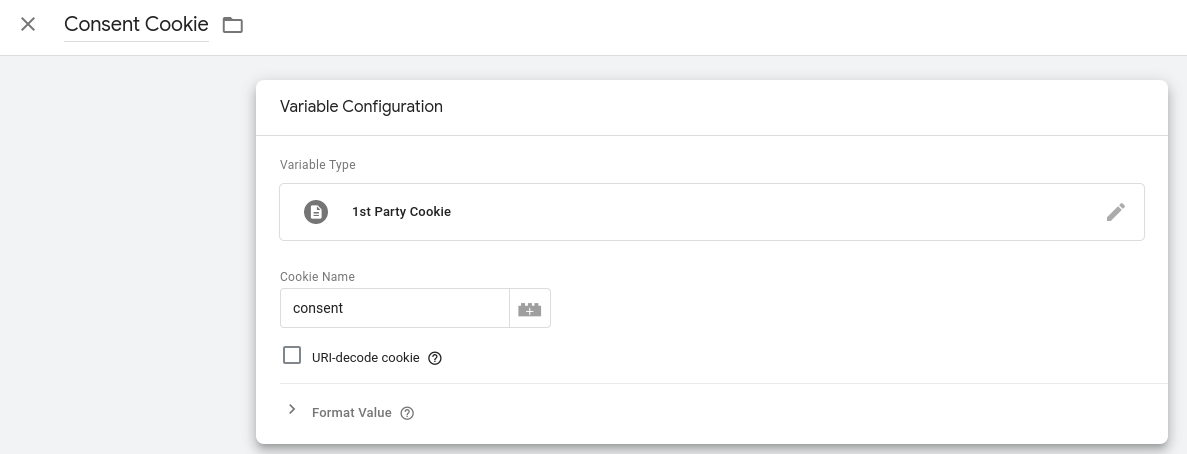
Let's start with the cookie. In order to use the cookie as a trigger, we'll need to identify it as a variable first. This is easy enough:
- Head to Variables and under "User-Defined Variables", click "New".
- When prompted to choose a variable, choose "1st Party Cookie" from the "Page Variables" sub-header.
- You'll be prompted to enter your cookies name; in our case, it was "consent"; click "Save".
- You'll need to name this variable--I used "Consent Cookie"; take note, since you'll need to reference the name in the trigger.
Now that we've identified the cookie as a variable, let's set it up as a trigger:
- Head to Triggers and click "New".
- When prompted to choose a trigger type, choose "Custom Event" from the "Other" sub-header.
- For the "Event name" we'll use "gtm.load" (w/o quotes);
- Ensure that the trigger fires on "Some Custom Events" by clicking the according checkbox.
- In the first drop down, you should see the cookie variable (in my case, "Consent Cookie"); select it.
- Leave the operator as "equals";
- In the third field, you'll want to enter the value of your cookie (recall, ours was "yes"). Click "Save".

Cool! The last step in getting the cookie's to act in a trigger is to add them, as a trigger, to your tag. Go to your tag and under the triggering section, find the Custom Event you just finished creating. Save and preview/publish; you should find that once you've clicked "YES" in your opt-in block, your cookie loads and your tags will fire.
ALTHOUGH, the tags will only fire on pages viewed AFTER the user navigates to another page on the site. The reason for this isn't really clear to me. My guess is that it's probably because our custom event is associated with 'gtm.load' (Window Load); since Window Load has already finished by the time users opt-in, our tag won't fire until the next Window Load. There may be other events we can associate with our cookie trigger, but a simple way to fix this is to setup a second trigger--a click event for the opt-in block: we can use a click on the "YES" link to also trigger our tag. Let's do that.
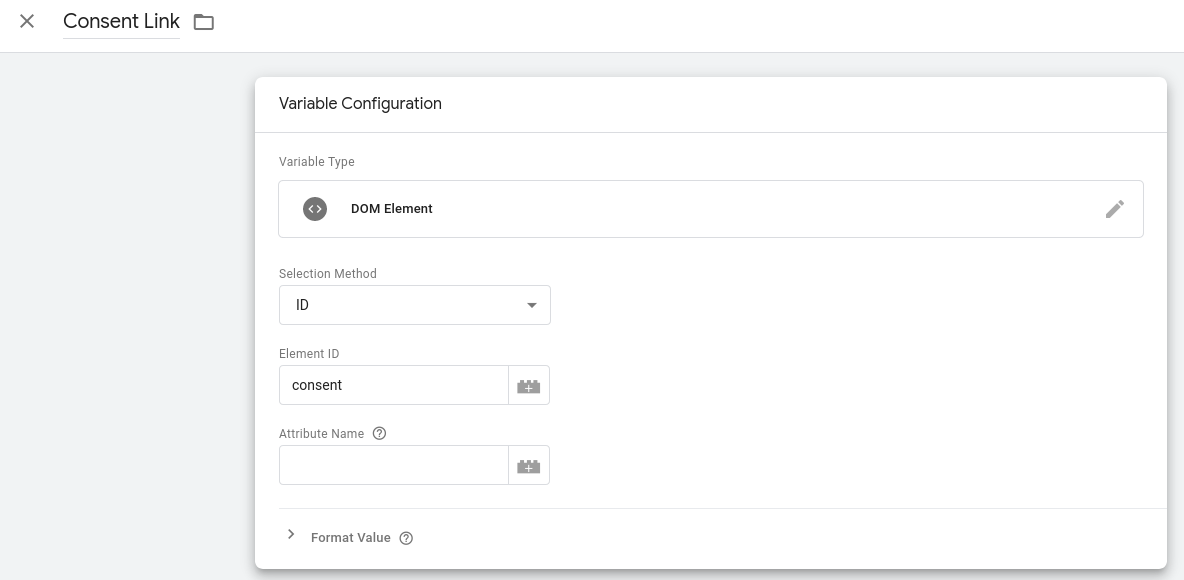
We'll start by creating a link variable. In order to do this, you'll need to assign an ID attribute to the "YES" link (in our case, when we setup our block, we already gave it an ID value of "consent"). Here are the steps to set it up:
- In Tag Manager, head to Variables and create a new User-Defined Variable.
- For the Variable Type, choose "DOM Element"
- For "Selection Method" it should default to "ID"; that's fine, but note you can also use "CSS Selector"
- For "Element ID" let's go with our link ID; in our case, we chose "consent"; Save.
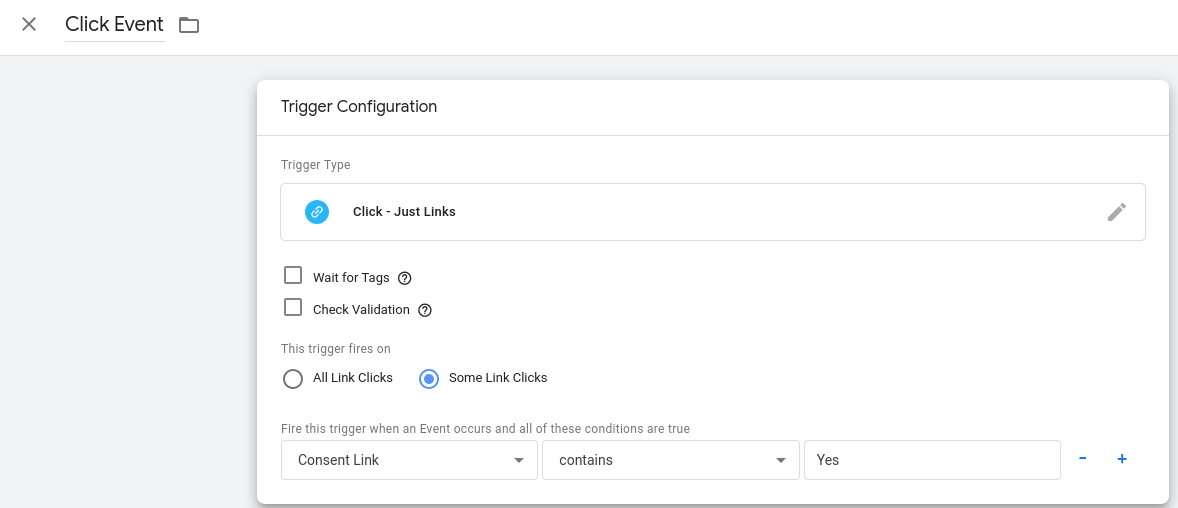
Now that the variable is done, we just need to reference it in a Click Event trigger. Here's how we do that:
- Create a new trigger--for trigger type, choose "Click - Just Links".
- Tell the trigger to fire on "Some Link Clicks" by checking the appropriate checkbox.
- In the first drop down, you should see the link variable you just created; select it.
- "Equals" should be fine for the operator; for some reason I chose to use "contains" though (this is better if you only need to match one word in the link text).
- In the last field, provide your link text: in our case, we used "Yes" (case sensitive); click "Save".
That's it! Now we can go add this as a second trigger to our tag. Not only will the tag fire when users have our cookie present--it'll now fire the moment they opt in. Yay!!!
A couple caveats to all of this: first, you'll need to go through this process for each of the tags you have running on your site. Once you've defined variables and triggers, though, implementing for each individual tag should be relatively quick. Second, the closeBlock() function on the disclaimer block doesn't prevent the block from showing on consequently viewed pages (you'd need a cookie for that...)--making it a bit superfluous. You could easily set the block up without the "no" feature. Either way, the disclaimer block should probably be designed so that it's not overly intrusive.
There you have it: quick and relatively easy consent. How cool is that?